Queueing machine learning jobs using a build server
There’s a history for this post. What’s here:
- why it is handy to schedule training jobs with a build server
- on continuous delivery for scheduling and tracking
- setting up TeamCity for this purpose
- configuring Apache web server to expose the build server
- setting up a build agent
- configuring the command line runner
UPDATE
There’s a sequel to this post
Disclaimer
Be careful with exposing services as described below, it’s at your own risk. This is a setup that I use on a server that is easily removed and replaced without any loss of work, but if you want to integrate the setup below in a corporate network on a production environment, consult your security officer and deployment specialist on fine-tuning the setup. Many setup details below are based on Debian(-derived such as Ubuntu) systems, assuming that the dependencies for deep learning are already host-installed.
Queueing machine learning jobs using a build server
This is a self-proclaimed best practice for scheduling machine learning jobs through a build server. There are several very good reasons to start doing this, so if you bear with me for a moment to gloss over the use cases, I’ll promise to make it worth your while.
I experiment a lot with different neural net layouts that aren’t parameterized (yet) through hyperparameters. For instance: I alternate between a concatenation layer in 2D with a RepeatVector, and one in 3D with a Reshape layer, add a ReLU here, a time-distributed dense layer there. So, I have a lot of different versions of neural net configuration, different versions of my python-scripted experiments that I of course check into my GitHub-based version control system (so should you). I try many different setups, but I often lose track of which configuration worked best, or at all. I use timestamps in logging the training and validation loss values, but based on this alone it’s quite a hassle to backtrack to the exact commit that went with that run. I started archiving copies of my script runs with the same timestamp, which improved a lot, but then of course you get stuck with a growing duplicated archive that’s supposed to be already present in your version control system!
Then there was the problem of scheduling the training runs themselves. I’m working of several setups at the same time, some taking hours to complete. I already set up a simple notification system using Slack (check out my setup here), but if my session ends in the middle of the night, I’m not going to get up to start a new session. If only there was a simple way to create a pool of training jobs that can be executed in the span of hours, days or even weeks…
Enter Continuous Delivery
I started to see that both problems - provenance trail and scheduling - are problems that are handled routinely by build servers in continuous integration and delivery pipelines. We work with them a lot at the National Cadastre, but I’m not sure they are used much in machine learning. But I can hardly believe that scripts such as sketch-rnn are developed ‘just’ by running on some server by hand for several hundred times (how do they do these things?). Surely there must be some kind of build system behind the development of a lot of professionally crafted models?
At least I now have build serve setup that you can implement, for completely free! For starters, it got rid of the traceability/provenance problem of the best performing model configuration. I don’t need to archive a copy of the script file I’m running, because I can easily look up the timestamp to a particular build session time. As an added bonus, the build server stores a log of all console output as well.
Secondly, choosing the right build server even allows me to schedule machine learning jobs for any period of time! I started out with Jenkins at first, but Jenkins doesn’t seem to allow queueing multiple build jobs. So I switched to TeamCity instead, which unfortunately isn’t open source, but it’s a marvel and free for a maximum of three build agents. It’s from JetBrains, the company behind PyCharm (which IS open source and which you are using too or you’re not living your life right).
TeamCity
Choosing TeamCity allowed me to sort out my development pipeline in one elegant swoop. It’s a little harder to set it up than Jenkings, but it’s worth the extra effort. It took me about five hours of reading, fiddling and testing to get a first ML training job running and no way I’m going back to hand-starting all my jobs.
First of all, thou shalt dockerize the deployment of TeamCity, using a docker compose configuration:
version: "2"

services:
  teamcity:
    image: jetbrains/teamcity-server
    volumes:
      - ./teamcity_logs:/data/teamcity_server/datadir
      - ./teamcity_server_data:/opt/teamcity/logs
    ports:
      - "8111:8111"
This will use the built-in HSQLDB configuration not intended for production, but since I’m the only user of my build server, this doesn’t matter. If you want to schedule stuff for a large(r) team, you may want to switch to a PostGreSQL backend, added to the docker-compose configuration.
From the directory the docker-compose.yml resides in, you run docker-compose up -d to start the build server. Once it is running, you can access it through http://localhost:8111. From there, you follow the instructions for starting up the build server. Create a new project by pointing it to connect to your GitHub account. Go to GitHub developer settings and enable TeamCity, filling out the details that the GitHub project page from your TeamCity server page provided.
Apache configuration
Now this is the part the disclaimer is for. For the automatic GitHub configuration in TeamCity to work, you need to expose TeamCity to the big bad open internet. So be careful you use strong passwords to protect the login of your system. Don’t use ‘admin’ as a admin account, change it to something less obvious. Also: you probably need to poke a hole in your firewall to allow TeamCity to communicate with GitHub. If you’re using an Amazon Deep Learning AMI server as I do, there’s docs here. I don’t know which firewall you are using, so I let that part for you to figure out.
I use Apache web server to expose the build system to the outside world, by creating a virtual host just for this purpose. Under /etc/apache2/sites-available/ create a buildServer.conf file and adapt the following reverse proxy settings:
<VirtualHost *:8111>
        ServerName buildServer
        ServerAdmin you@localhost # or whatever
        DocumentRoot /var/www/html # not sure you even need this...

        ErrorLog ${APACHE_LOG_DIR}/error.log
        CustomLog ${APACHE_LOG_DIR}/access.log combined

        ProxyPass / http://localhost:8111/
        ProxyPassReverse / http://localhost:8111/

</VirtualHost>
(or something similar)
Also, you need to enable the 8111 port (or another of your choice) listening for apache in /etc/apache2/ports.conf: add
Listen 8111
Test the configuration through sudo apachectl -t and enable through sudo a2ensite buildServer and sudo service apache2 reload. You can test your configuration by visiting the public ip address and port: it should show the TeamCity login page.
Setting up the build agent
Once you have tested the setup for a successful connection from TeamCity, we come to the part where it gets a little bit fiddly. It’s nothing to worry about, but it’s a little different from Jenkins. TeamCity always uses a separate build agent to execute the build instructions you provide. There’s no other way around it, while Jenkins can be its own build agent (although it doesn’t have to).
We dockerized the build server setup, but we’re not going to do so for the build agent because all my dependencies are on a pre-built Amazon deep learning image. To dockerize the agent, we would have to duplicate half the packages on the host in the container. That’s not worth investing my time to, but if you’re on a clean system to begin with, I think it would be prudent to dockerize the agent as well. To set up a host-based build agent, you download the zip file from the “Install Build Agents” link in the Agents menu situated at the top, as described here. Unzip the zip contents somewhere decent and install it using the bin/install.sh script, then start it with bin/agent.sh http://localhost:8111. Don’t forget to add this TeamCity server address, otherwise it won’t be able to connect to the build server. Also, note that on a server reboot the agent won’t start automatically. You can find instructions here on how to set up an init script that will do just that.
Go back to the Agent menu, authorize and enable the agent. It is now ready to execute the command line instructions, since any default agent can run command line instructions.
The command line runner
Under the project configuration we specify the “Build steps” to be of the runner type “Command Line” , we’re passing it instructions to execute a shell script, with a twist:
bash script/build-script.sh %system.teamcity.build.changedFiles.file%
The parameter passed to the build script is a TeamCity-specific parameter that will be substituted by the path to a file containing a list of changes since the latest build. This will be parsed by the shell script we are passing it to:
#!/usr/bin/env bash
set -x
# Jenkins style
# CHANGED_MODEL_FILES=`git diff --stat --name-only $GIT_PREVIOUS_COMMIT $GIT_COMMIT | grep model | grep py | grep -v topoml_util`

echo "Changes:"
cat $1

# TeamCity style
CHANGED_MODEL_FILES="$(cat $1 | \
  grep -v DELETED | \   # do not process deleted files
  cut -d \: -f 1 | \    # split by ":", select the first column
  grep model | \        # execute only in model dir
  grep py | \           # execute only python scripts
  grep -v util)"        # don't execute scripts in the util dirs

echo "Selected files to execute:"
echo ${CHANGED_MODEL_FILES}

set -e
cd model
for FILE in ${CHANGED_MODEL_FILES}
do
	python3 ../${FILE}
done

echo "built!"
Ok, this may not the prettiest but it is easy to extend or alter to suit your own requirements.
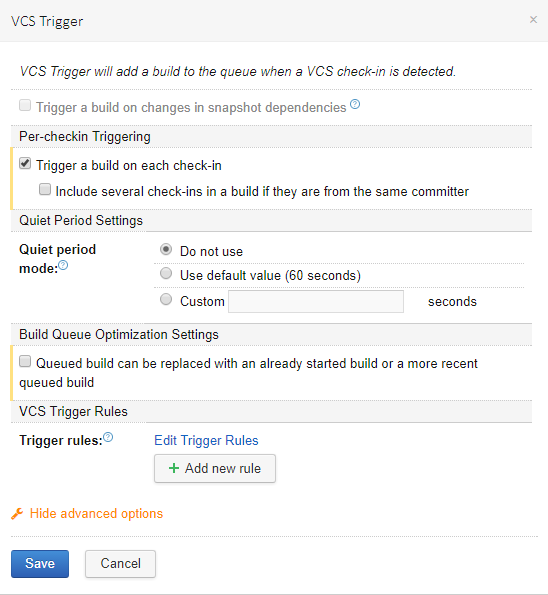
Build triggers
The whole idea of using this build server setup was to trigger builds on every push event, even if these events contain updates on the same file. This way, we can schedule consecutive builds (training jobs) on different architectures for the same script. For this, we need to enable TeamCity to trigger a build for each check-in. Go to the project and select ‘Edit Configuration settings’, go to ‘Triggers’ and edit the VCS trigger settings to trigger builds for every check-in and have no quiet time:
And you’re all set! Test your setup by pushing a python script to your model dir (or however you’ve set up your project) and see your project execute your training scripts with full history!