QGIS plugin development
TL;DR:
This isn’t a beginners’ guide to QGIS plugin development, there are other excellent resources out there (although some of them may be somewhat dated, as this post will some day be as well). This post discusses how to design integration tests for python plugin scripts that target QGIS version something like 3.18. They were tested on 3.18. If you’re targeting a newer version, things may not work as explained here.
My take on the approach is all open here
My Dockerfile is here, and the integration test is here. The test is run using this GitHub Actions spec.
- Use this QGIS Docker image to run your integration tests
- Derive your own Dockerfile from this image, copy your plugin and tests into the image
- Install the plugin to
/QGIS/build/output/python/plugins(possibly subject to future change) - Add the path
/QGIS/build/output/python/pluginsto the PYTHONPATH - Add an integration test script containing a
def run_all()function. This function is expected to be present. - Inside the
run_all()function, instantiate your plugin using theclassFactoryfunction. This is what QGIS would normally call as well to instantiate your plugin and it should be part of the integration test to verify it’s working correctly. - Put your (calls to) integration tests in this function.
- If you use the standard lib
unittestmodule and define a `class MyTestCase(unittest.TestCase), and execute it using something likedef run_all() -> None: suite = unittest.TestLoader().loadTestsFromTestCase(MyTestCase) assert unittest.TextTestRunner(verbosity=2).run(suite).wasSuccessful() - If you want to write
pytesttests, add aprint('Ran OK')line in yourrun_allfunction, otherwise the integration script will not recognize the test as successful. COPYover the integration test to the imageRUNthe test usingRUN xvfb-run qgis_testrunner.sh {insert_your_test_script_filename}without the .py file extension!- Sit back and observe all the black magic unfold.
QGIS is awesome
QGIS, as a (the?) premier GIS client software - is one of my favorite open source projects. Not just because I’m a geospatial developer/researcher but also because I have seen the fantastic development it has gone through over the years. It gained a ton of features and a lot more stability along the way. Not that there’s no rough edges, but rough edges are in any piece of software if you dig deep enough.
Although I have been a QGIS user for quite some time, although I never acquainted myself with all the nooks and crannies of the package. However I recently followed an (internal) masterclass on using the Atlas feature that lets you auto-generate templated fancy cartographic layouts of your data. Nowadays I’m more of a “what did I actually produce using this {script,query,export}?” user of QGIS, but I did extensive mapping and editing previously and I found it an extremely useful tool for the job. Particularly helpful for example is the setting where new polygon parts overlapping with already present objects can be automatically clipped (see tutorial part 15-17) , then select “Avoid overlap on active layer”:

For heavy digitisers, this option will save you hours of work and delivers clean maps with non-overlapping polygons.
But I digress.
QGIS plugin development
My Python skills have come to fruition only relatively recently over the past couple of years, and pure out of curiosity I started doing some research on what the current state of Python plugin development for QGIS is at the moment. I started with a simple goal: just to learn some stuff about QGIS plugins in Python and have some fun along the way ( mission: accomplished), but I also decided not to back down on the more complicated stuff. I created a plugin called Namari that allows you to do anomaly detection on geospatial data.
So, I took to the docs which recommends using the plugin builder to get started. I must say that this plugin builder is phenomenal to get started with creating your own plugins. It bootstraps an absolute ton of resources for you, but perhaps a little on the heavy side - it’s easy to get overwhelmed by the amount. I also created some level of discussion on the current state of this plugin builder .
Now, I’ve become something of a testing enthusiast over the years. I think it has to do a lot with both research reproducibility and product stability. Tests allow you to formally verify that something does what it is expected to do, which often makes me wonder why so little unit/integration testing is done in research.
It probably has a lot to do with the fact that writing good tests is very hard. I can tell, because I do a lot of it. But if it were only hard, I wouldn’t be doing it. Writing tests offers me a level of satisfaction that I cannot reach from writing working software alone. Testing doesn’t offer every guarantee: your software is stable only to the level of tests can verify and then it still doesn’t protect from misuse. But even more than some level of proven correctness, I truly believe testing can be fun, because of the main goals I set for myself: just to learn stuff.
And boy does testing stuff get you to learn stuff. I’d almost say that writing tests is maybe the single most effective way of learning about library APIs and the inner workings of your own code doodles. None more so than for writing integration tests for QGIS plugins. So here we go.
QGIS plugin integration testing
Doing unit testing on parts of the plugin is all fine and dandy, but I wanted to do a little bit more than just that. After all, a QGIS plugin often has some kind of interaction with the graphical user interface of QGIS. So, how do we test this interaction?
The answer is through integration testing with a working QGIS instance. Now this is where things get quite complex. QGIS
offers a qgis python package installed in the site-packages of the Python version used by QGIS. But importing this in
a stand-alone Python script doesn’t get you a fully working QGIS instance, it’s just a reference to a module that’s
intended to run as an embedded Python process. So, this process needs to be tied to a running QGIS instance if you
want to make use of its full range of capabilities.
The iface object
Central in the understanding of the connection between the Python qgis namespace and the QGIS app is the notion of
the iface. This iface object can be accessed from a running QGIS Python console (just press Ctrl-Alt-P to start
one):
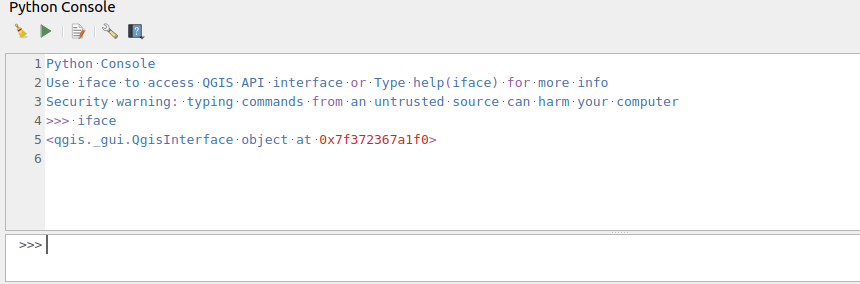
This iface object gives you an instance of a qgis.gui.QgisInterface, which kind of is the bridge between a plugin and
events in QGIS. This is why practically all QGIS Python plugins are instantiated by passing (or you could say
dependency-injecting) this iface object into the plugin constructor.
But you’re getting none of this iface goodness just by unit testing. The plugin builder side-steps this problem by
offering
a stubbed QGIS interface object
, but of course this doesn’t do much unless you re-create a lot of the functionality here yourself. But that is both
tedious and unhelpful: we want to validate the workings of our plugin in a real QGIS environment, not in a stub. How
are we going to check whether it will work in the wild otherwise?
The hunt for this elusive iface object is documented on several
places: here is my own
, but others have hit this as well here
and here. After
a lot of searching and trying, I managed to come up with a solution that will work almost everywhere.
Ingredient number one: a Dockerfile
For quite some time now, I have been using Docker as a very helpful development tool. Docker isn’t just handy for packaging and shipping, it’s also very versatile as part of a development toolchain. The reason is that it:
- allows you to build on your own or others’ previous work, the whole standing on shoulders of giants (including your own :) thing
- allows you to mess up you build environment inside an isolated environment without having to deal with the fallout of a broken development system. If your development environment inside Docker made a mess, then just rinse and repeat without any sweat
- allows you to make reproducible builds much more easily. If you can get it to work on your local Docker env, whether you built on Linux, Mac or Windows, it will probably work on something like GitHub actions/Travis/Jenkins/TeamCity/Gitlab CI/CircleCI or whatever CI system you’re using. There’s no self-respecting CI system that doesn’t support Docker.
- allows you to just remove the test image you built from your local machine and get rid of every last bit of toolchain you needed for your project and leave with a clean local system. I cannot tell you how many times I screwed up my machine setting up all kinds of weird build toolchains that started to get into version conflicts and having no clue on how to untangle things other than just to uninstall the whole lot (or worse, just flush my machine OS).
In this case I think it’s definitely worth using the official QGIS latest Docker image for the integration testing. It has all the assets you need to get started designing integration tests. You could use your own local QGIS installation but the trouble is of course that when you copy or remove the wrong files or to the wrong location, you end up with a broken QGIS (or worse). So, for development and experimentation, I find a Docker image to be ideal. So: start your own Dockerfile with
FROM qgis/qgis:release-3_18
# Or whatever version you're targeting
You can even parameterize the release version, so you can test your plugin against multiple QGIS versions without having to install them:
ARG VERSION
FROM qgis/qgis:release-$VERSION
# Or whatever version you're targeting
and then build using docker build -t my_plugin:newer --build-arg VERSION=3_18
Ingredient number two: a special integration test script
Second aspect of our integration test toolchain is a special python script that can be executed by
a qgis_testrunner.sh
script that is present in the QGIS Docker image by default. You can call your python script anything you want, but
the minimal requirement is that:
- it can be found by the
qgis_testrunner.shshell script, - that it has a
run_all()function (having no parameters, returning nothing) and - that at some point it emits a
RanandOKthrough standard out.
The most simple test script that can be ran by the test runner inside the docker image is thus:
def run_all():
    print('Ran OK')
However, this test script is capable to do a lot more: it is able to instantiate our plugin with an actual iface
interface to the QGIS application!
from qgis import utils
from namari import classFactory


def run_all() -> None:
    print('Hello QGIS!')

    plugins = utils.plugins
    assert utils.iface is not None, 'This test needs an actual iface interface to QGIS'
    plugins['namari'] = classFactory(utils.iface)
    print(plugins)

    print('Ran OK')
So, this script will not only verify that we have a real iface object instead of a stubbed or empty one, but it will
also instantiate our plugin (called namari) to hook directly into the QGIS application. For comparison: you can
import iface from qgis.utils at any time from any python script, but the iface object will be None unless you
import it inside a running QGIS application - or from this qgis_testrunner.sh.
Now that we have the beginnings of our Python integration test script, we can call it using qgis_testrunner.sh.
We expand our Dockerfile by:
- copying our plugin,
- using
pb_toolto deploy the plugin files to the QGIS plugins dir, - add the plugins dir to the PYTHONPATH and
- call the test script
FROM qgis/qgis:release-3_18
# You should consider using pipenv for dependency management
RUN pip install pb_tool

WORKDIR plugin
# Copy all your plugin files to the plugin working directory
COPY . ./

# Put the rather long path to the standard plugins dir in a PLUGIN_DIR environment variable for re-use
ENV PLUGIN_DIR=/QGIS/build/output/python/plugins

# Deploy plugin to standard plugins dir using pb_tool
RUN pb_tool deploy --config_file pb_tool_docker.cfg --plugin_path $PLUGIN_DIR --no-confirm

# Run the integration tests by using the test script
ENV PYTHONPATH=$PYTHONPATH:/namari/test:$PLUGIN_DIR
RUN xvfb-run qgis_testrunner.sh integration_test
And qgis_testrunner.sh will run your integration tests!